|
Effective Wall Insulation
Air Sealing
Moisture Control
Wall Framing with Advanced Framing Technologies
2x6 Wall Construction
What Type of Insulation Should I Use?
Wall Sheathings
Steps for Effective Wall Construction and Insulation
Effective Wall Insulation
Properly sealed, moisture-protected, and insulated walls help increase comfort, reduce
noise, and save on energy costs. However, walls are the most complex component of
the building envelope to insulate, air seal, and control moisture.
The keys to an effective wall are:
- Airtight construction - all air leaks sealed in the wall during construction and prior
to insulation installation.
- Moisture control - exterior rain drainage system, continuous air barrier, and vapor
barrier located on the appropriate side of the wall.
- Complete insulation coverage - advanced framing to maximize insulation coverage and
reduce thermal bridging, no gaps or compressed insulation, and continuous insulated
sheathing.
Air Sealing
Air sealing reduces heat flow from air movement (convection) and prevents water vapor in
the air from entering the wall. In a 100-square foot wall, one cup of water can
diffuse through drywall without a vapor barrier in a year, but 50 cups can enter
through a 1/2-inch, round hole. In fact, sealing air leaks is 10 to 100 times as
important as installing a vapor barrier.
Moisture Control
Air sealing and moisture control make insulation more effective. It is a myth that
installing vapor barriers is the most important step for controlling moisture in walls.
Vapor barriers only retard moisture due to diffusion, while most moisture enters
walls either through fluid capillary action or as water vapor through air leaks.
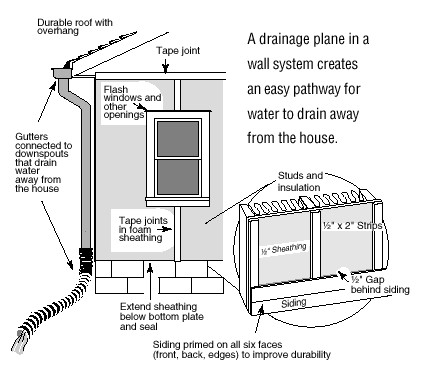
Prevent Rain Penetration
Causes of rain leaks through exterior walls include improper installation of siding
materials; poor-quality flashing, weatherstripping, or caulking around joints in the
building exterior (such as windows, doors, and bottom plates); and wind-driven rain that
penetrates the exterior finish. To enhance protection against rain penetration,
create a drainage plane within the wall system of the home.

Control Moisture in Walls
All climates require these steps:
- Install a polyethylene ground cover on the earth floor of houses with crawl spaces and
slope the ground away from the foundations of all houses.
- Install a continuous vapor barrier that has a Perm rating of less than one.
- Place a termite shield, sill gaskets, or other vapor-impermeable membrane on the top of
the foundation wall. This action will prevent moisture from wicking into the framed
wall from the concrete foundation wall by capillary action.
Wall Framing with Advanced Framing Techniques
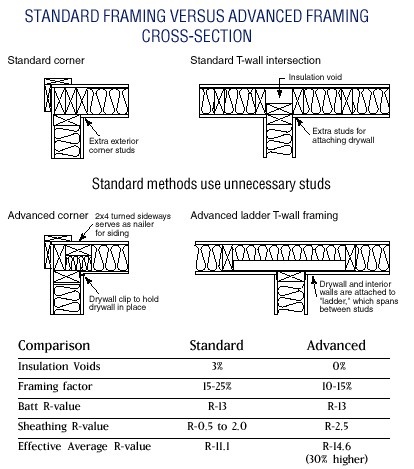
Building experts have performed considerable research on ways to reduce the amount of
lumber in our homes while maintaining structural integrity. The U.S. Forestry
Products Association and other organizations have devised an "optimum value
engineering" (OVE) framing system that reduces unnecessary lumber use and improves
the whole-wall R-value by reducing thermal bridging and maximizing the wall area that is
insulated. Selected OVE practices include:
- Design the house to use materials efficiently by employing simpler shapes and volumes,
compact designs, and designs based on a 2-foot module.
- Frame at 24-inch rather than 16-inch centers.
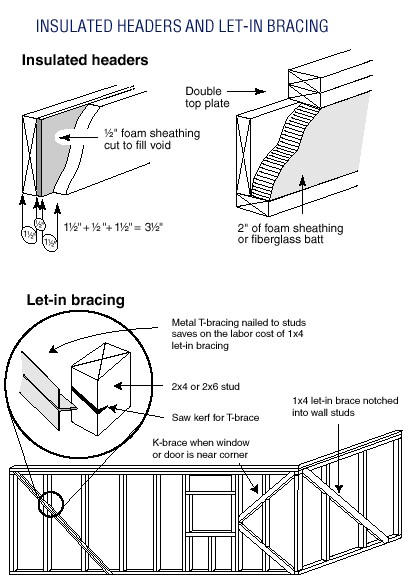
- Design headers for loading conditions and use insulated headers.
- Locate window and door openings in-line with established framing and size windows to fit
within existing stud spacing.
- Eliminate unnecessary framing at intersections using two-stud rather then three-stud
corners and ladder blocking where interior partitions intersect exterior walls.
- Use let-in bracing to allow the use of insulated sheathing in corners.
- Eliminate curtailed studs (cripples) under windows.
- Align roof, wall, and floor framing members (studs and joists) vertically throughout the
structure so that a single top plate can be used.

2 x 6 Wall Construction
In most code jurisdictions, 2x6's can be spaced on 24-inch centers, rather than 16-inch
centers used for 2x4's. The advantages of using 2x6 studs on 24-inch centers are:
- The thicker wall cavity provides room for R-19 or R-21 wall insulation.
- Overall, thermal bridging through studs is reduced due to the higher R-value of 2x6's
and less stud area in the wall.
- Less framing reduces labor costs.
- There is more space for insulating around piping, wiring, and ductwork.
The economics of 2x6 wall construction is favorable primarily in areas with significant
winters and homes in which windows and doors occupy 10 percent or less of the total wall
area. Walls with substantial window and door area may require almost as much framing
as 2x4 walls because each opening can add extra studs. Additionally, the window and
door jambs must be wider, requiring the purchase of a jamb extender that increases costs
by $12 to $15 per opening.
Thicker insulated sheathing may be a less expensive way to increase overall R-value
than 2x6 construction, especially in homes with more window and door area. Another
factor to consider is that the interior finish or exterior siding may bow slightly between
studs when using 24-in centers.
What Type of Insulation Should I Use?
The home designer has an increasing array of insulation products from which to choose to
insulate wood-framed walls. The wide variety of insulation materials often makes it
difficult to determine the most cost-effective products and techniques.
- Fiberglass and rock wool batts - 2x4 walls can hold R-13 or R-15 batts; 2x6 walls
can have R-19 or R-21 products. Generally, batt insulation is the least expensive
wall insulation material but requires careful installation for effective performance.
- Cellulose insulation, made from recycled newsprint, comes primarily in loose-fill
form. It can be installed in walls using a dry-pack process or a moist-spray
technique. It generally costs more than batt insulation, but it offers reduced air
leakage through the wall cavity plus improved sound deadening.
- Fiberglass and rock wool loose-fill insulation provide full coverage with a
"Blow-in Blanket" System (BIBS) that involves blowing insulation into open stud
cavities behind a net.
- Rigid foam insulation has a higher R-value per inch than fiberglass or cellulose
and stops air leaks, but it is considerably more expensive. It is manufactured in
sheet-good dimensions and is often used as the outer layer of insulation.
- Foam-in-place insulation can be blown into walls and reduces air leakage. Some
types use carbon dioxide in the manufacturing process rather than more environmentally
harmful gases such as pentane or hydrochlorofluorocarbons.
Wall Sheathings
Some builders use 1/2-inch wood sheathing (R-0.6) or asphalt-impregnated sheathing,
usually called blackboard (R-1.3), to cover the exterior framing before installing siding.
Instead, consider using 1/2-inch foam insulated sheathing (R-2 to R-3.5). Sheathing
thicker than 1/2 inch will yield even higher R-values.
Foam sheathing has these advantages:
- The continuous layer of insulation reduces thermal bridging through wood studs, saving
energy, and improving comfort.
- It is easier to cut and install than heavier weight sheathing products.
- It protects against condensation on the inside wall by keeping the interior of the wall
warmer.
- It usually costs less than plywood or oriented strand board (OSB).
Ensure that the sheathing completely covers, and is sealed to, the top plate and band
joist at the floor. Most sheathing products come in 8-, 9-, or 10-foot lengths to
allow complete coverage of the wall. Once it is installed, patch all holes,
penetrations, and seams with caulk or housewrap tape.
Because of its insulation advantages over plywood and OSB, foam sheathing is best when
used continuously in combination with let-in bracing, which provides structural support
similar to that offered by plywood or OSB. Some builders use two layers of
sheathing-plywood or OSB for structural support and a seam-staggered layer of rigid foam
for insulation. When the total depth of the sheathing material exceeds 1/2 inch,
make certain the window and door jambs are adjusted for the total wall thickness.
Some flanged windows are readily adaptable to this approach.

Steps for Effective Wall Construction and Insulation
- Review the plans and specifications and identify all walls (including bandjoists)
between conditioned (heated and cooled) spaces and unconditioned spaces (exterior, attics,
crawl spaces, garages, and mechanical rooms). Use advanced framing techniques to increase
insulation levels and reduce lumber use.
- Use diagonal corner bracing (let-in bracing) on exterior walls to substitute for corner
plywood sheathing and allow continuous insulated sheathing.
- Use foam sheathing for insulating headers to reduce framing heat loss.
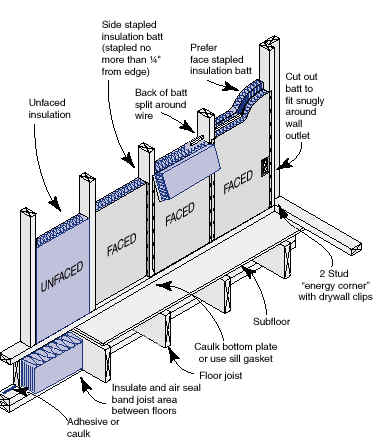
- Seal all air leaks through walls before insulating, including under the bottom plate,
band joist areas between floors, electrical boxes, and all electrical, plumbing, and HVAC
penetrations.
- Use caulk and backer rod or non-expanding spray foam, not insulation, to seal around
window and door jambs.
- If fixtures such as stairs or shower/tub enclosures cover exterior walls and do not
allow easy installation of insulation after the sheathing is attached, insulate behind
these components in advance using R-13 or R-19 batts and cover with a weatherproof barrier
(1/2-inch drywall, plastic, or other sheet material).
Face-staple batts because side stapling creates channels for air flow
and compresses the insulation, thus reducing the R-value. If face stapling is not an
option, use unfaced batts or carefully side staple with 1/4 inch of the stud face.

- Obtain full coverage of batt or blown wall insulation. Cut batt insulation to fit snugly
into non-standard stud spaces and to completely fill cavity.
- Slit batt insulation to fit around the back and front side of electrical wiring and
plumbing without compressing or tearing the insulation.
- Notch out batt insulation around electrical boxes and use scraps to insulate behind the
box.
- Once the interior drywall is in place, seal all penetrations with durable caulking.
Source: US DOE, Office of Building Technology, State and Community Programs Energy
Efficiency and Renewable Energy. | 


