Installation Instructions
When you turn on a hot-water faucet during cold weather, it may take several seconds for the water to become hot. This happens because the water travels through pipes from the water heater to the faucet, and some of the pipes may pass through unheated sections of the house, such as the basement. As a result, the hot water loses some of its heat to the surrounding space. This heat loss can be reduced by insulating hot water pipes wherever they are accessible--especially in unheated areas. Insulating the water heater tank and the first 3 feet of pipe coming from the tank could reduce your water heating costs. Be aware, however, that some manufacturers do not recommend insulating their water heaters, so be sure to check the manufacturer’s instructions before installing any water heater insulation. To insulate pipes, use a good-quality plastic or rubber foam at least ¾” thick. Do not cover unions or fittings at the end of the flex lines, and stay clear of the draft diverter on gas heaters. Make sure all fittings are dry and in good shape before installing the wrap. Use quality pipe insulation wrap, or neatly tape strips of fiberglass insulation around the pipes. Eventually the water will cool, but it will remain warmer much longer inside insulated pipes. Insulating your water-heater storage tank is a fairly simple and inexpensive improvement that can help maintain the water temperature at the thermostat setting. Some newer models of water heaters are well insulated and do not need an added layer, but a heater that is warm to the touch needs additional insulation.  | Easy-to-install, pre-cut blankets (or jackets) for electric water heaters are widely available and range in cost from $10 to $20. When properly installed, a water heater blanket on an electric water heater will pay for itself in energy saved within 1 year. Installation is more difficult on gas- and oil-fired heaters. Ask your local furnace installer for instructions. If your water heater is at least 7 years old, you should carefully evaluate your water-heating needs and investigate the types of heaters that could replace your current one. Although most water heaters last 10 to 15 years, early investigation and timely replacement can ensure a wiser purchase. |
Installation Instructions - Cut the tank top insulation to fit around the piping in the top of the tank. Tape the cut section closed after the top has been installed.
- Fold the corners of the tank top insulation down and tape to the sides of the tank.
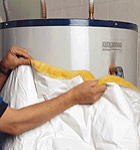
- Position the insulating blanket around the circumference of the tank. For ease of installation, position the blanket so that the ends do not come together over the access panels in the side of the tank. Some tanks have only one access panel.
- Secure the blanket in place with the belts provided. Position the belts so they do not go over the access panels. Belts should fit snugly over the blanket but not compress it more than 15% to 20% of its thickness. The installation is easier with two people. If working alone, use tape to hold the blanket to the top until you get the belts into position.
- If your water heater has the temperature/pressure relief valve and the overflow pipe on the side of the tank instead of on the top, install the blanket so these items are outside of the blanket. Depending on the piping arrangement and location, you may need to compress, or even cut, the blanket.
- Locate the four corners of the access panel(s). Make an x-shaped cut in the insulating blanket from corner to corner of each access panel.
- Fold the triangular flaps produced by the cuts underneath the insulating blanket. Repeat steps 6 and 7 for the rating/instruction plate.
- The blanket must not be installed on a leaking tank.
| 